.svg)
Hardware Wallets: What You Need To Know


Why you need a hardware wallets for your crypto and how to choose one
What is a Hardware Crypto Wallet?
A hardware blockchain wallet is a device for storing private keys to crypto wallets in a non-custodial way without connecting to the internet.
Sounds complex? Let’s unpack this definition, starting from the importance of self-custody.
Public and Private Crypto Keys, Self-Custody and Centralized Custody
There are two types of keys which control cryptocurrency transactions:
- Public keys are used for transactions with others, like an email address. You can share the public key freely, and it can be recovered if you lose it.
- Private keys control access to your tokens, ensuring that the actual owner of the tokens authorized spending and not a malicious actor. They MUST be kept secret, like a password.
You’ve probably heard the saying “not your keys, not your crypto”. If you don’t control the private keys to the account where your cryptocurrencies are kept, you risk losing the funds.
When you are the only person who has access to your private keys (i.e. you are the only custodian), it is called self-custody. Any wallet that supports self-custody is called non-custodial.
Conversely, if someone else, like a centralized exchange or a wallet provider, holds the private keys, it’s called centralized custody. Exchanges do provide justifications for it: if you forget your exchange password, you can recover access to the wallet using email, but if you lose the seed phrase and private key to a non-custodial wallet, there is no way to recover the money.
Still, the risks of storing crypto in a centralized exchange account are high. CEXs, which are often hacked or go bankrupt, taking their customers’ funds with them.

Hot vs. Cold Non-Custodial Wallets
There are two main types of non-custodial wallets:
- Software (hot) wallets are web or mobile applications, such as Pontem Wallet, MetaMask, or Phantom. They are connected to the Internet, which makes it far easier to send and receive money or use dApps.
Hot wallets can contain vulnerabilities that could be exploited. This is why it’s so important to use an audited, secure wallet, like our very own Pontem Wallet, and connect only to those dApps you trust, always checking the page address.
- Hardware (cold) wallets are dedicated physical devices that store your keys. To use your crypto, you connect the device to a computer via USB or Bluetooth. That’s the only time a hardware wallet is connected to the internet, thus protecting your assets from online exploitation.
Hardware wallets are a great compromise between security and utility. And since they are relatively inexpensive, they are an easy way to dramatically increase the safety of your crypto. Hardware wallets are sometimes called “cold storage,” since they are disconnected from a “hot” web connection.
Hardware Wallets
How Popular are Hardware Wallets?
It may seem like only whales and professional traders use hardware wallets. But in reality, the market is quite big: $350 million in 2024 to be exact, according to Mordor Intelligence. The same report also suggests that it will grow at an impressive CAGR of 28.8% to reach $1.56 billion by 2029. So you could say that hardware wallets are a billion-dollar opportunity. By the way, Asia Pacific (and not North America) leads in terms of the market growth rate.
Do You Need a Hardware Wallet?
In very broad terms, you need a cold wallet if you own more crypto than you can stand to lose without getting very upset.
Think of all your crypto holdings. If they were suddenly all gone, would it make you depressed, frustrated, or desperate? If yes, then a cold wallet is a good idea, at least for your long-term crypto stash that you’re not actively using for trading or DeFi.
Another approach is to compare the amount of crypto you own with the price of a hardware wallet. A device costs $50-150, so if your holdings are several times that (say, $500), then buying a cold wallet is justified.
Cold Wallet Brands & Models
There are numerous hardware wallet manufacturers, such as Ledger, Trezor, SafePal, CoinKite, and SatoshiLabs. Each brand has various models with different features, including:
- the types of token supported, although almost every option will support the most popular cryptocurrencies;
- support for DeFi features like staking and lending;
- support for dApp integrations;
- different connectivity options like USB, Bluetooth, and QR scanning.
Ledger is the most popular hardware wallet brand on the market with over 6 million devices sold. The brand offers four main models: touchscreen Ledger Stax and Ledger Flex, as well as entry-level Ledger Nano S Plus (costing just $79) and Ledger Nano X.
As for Trezor (the second most popular brand), it sells three models: Safe 5, Safe 3, and Model One, which costs only $59.
While Ledger and Trezor control most of the market, we should mention several more brands of hardware wallets:
- Ellipal: boasting 1 million users, Ellipal was the first hardware wallet to feature a touchscreen (though now there are also Ledger and Trezor models with a touchscreen). It also has a camera to scan payment QR codes. Prices for the Titan 2.0 model start from $169, while Titan Mini is $99.

- Tangem - designed as smart cards looking just like a bank card, and with a particularly secure chip similar to those used in biometric passports. Tangem’s firmware is open-source, meaning that the wallet will continue to work even if the company closes down; but it’s also non-upgradable, meaning that support for new blockchains cannot be added natively. Prices start from $54.90 for a set of two cads.
- NGRAVE: the defining feature of this cold crypto wallet is the high security standard (EAL7, as opposed to Ledger’s EAP5). Apart from being resistant to fire and flooding, it features a unique backup mechanism physically based in its stainless steel plates. NGRAVE wallets are on the pricier side, though: the Graphene model (without a touchscreen) costs $148, while Zero (with a touchscreen) is $398.
- BC Vault: like all the rest of the wallets on our list, it is marketed as “the most secure” hardware wallet. Using Wallet Connect, it can be connected to most dApps; NFT trading and storage are also possible. The basic Vault One model costs $160, while the customizable Gunmetal is $259.
- Cypherock: a relatively new brand offering the basic X1 Vault model and smart cards that use the NFC technology. DeFi and NFT apps can be accessed via Wallet Connect; note that iOS and Android support aren’t available yet. Prices for an X1 set with a Vault and 4 cards start at $159.
In the rest of this article, we will focus on Ledger and (to a smaller extent) Trezor, since our own Pontem Wallet was the first on Aptos to offer a Ledger integration. The table below provides a comparison of both Ledger and Trezor cold wallets.

How to Use a Ledger Hardware Wallet
Most of the functions of your Ledger are executed via the Ledger Live app. It replaces the previous suite of Ledger tools that included Chrome extensions and apps.
Ledger Live allows you to:
- Create and manage accounts;
- Download third-party apps for various blockchains;
- View assets and portfolio balance;
- Track crypto prices in 20+ fiat currencies;
- Store and manage ERC-20, ERC-721, ERC-1155, BNB Chain BEP-2 and BEP-20, Tron TRC-10 and TRC-20, and NEO NEP-5 tokens;
- View and send NFTs;
- Send and receive crypto (requires manual confirmation on the physical device);
- Swap, earn, and stake crypto (through select partners like Lido Finance);
- Interact with 15+ dApps natively supported by Ledger Live (1inch, Rarible, POAP, Paraswap, Lido, Zerion, etc.);
- Buy crypto with a card and other fiat methods, etc.

As you can see, Ledger Live is positioned as a “one-stop shop for crypto,” and for good reason. It turns Ledger from a cold storage device into a fully-functional wallet - even though you’ll still need to connect it to a hot wallet like MetaMask or Pontem to leverage DeFi and dApps fully.
How to Connect to Different Blockchains and Wallets with Ledger
Ledger Live natively supports a number of blockchains, such as Bitcoin, Ethereum, XRP, Tron, Tezos, Bitcoin Cash, Dogecoin, Stellar, Cosmos, and Algorand. It also supports non-custodial wallets like MetaMask, MyEtherWallet, Guarda Wallet, and MyEOSWallet.

However, for other chains and wallets, including Aptos and Pontem Wallet, you need to install third-party dApps. The same goes for Avalanche, Solana, MultiversX (Elrond), Flow, etc.
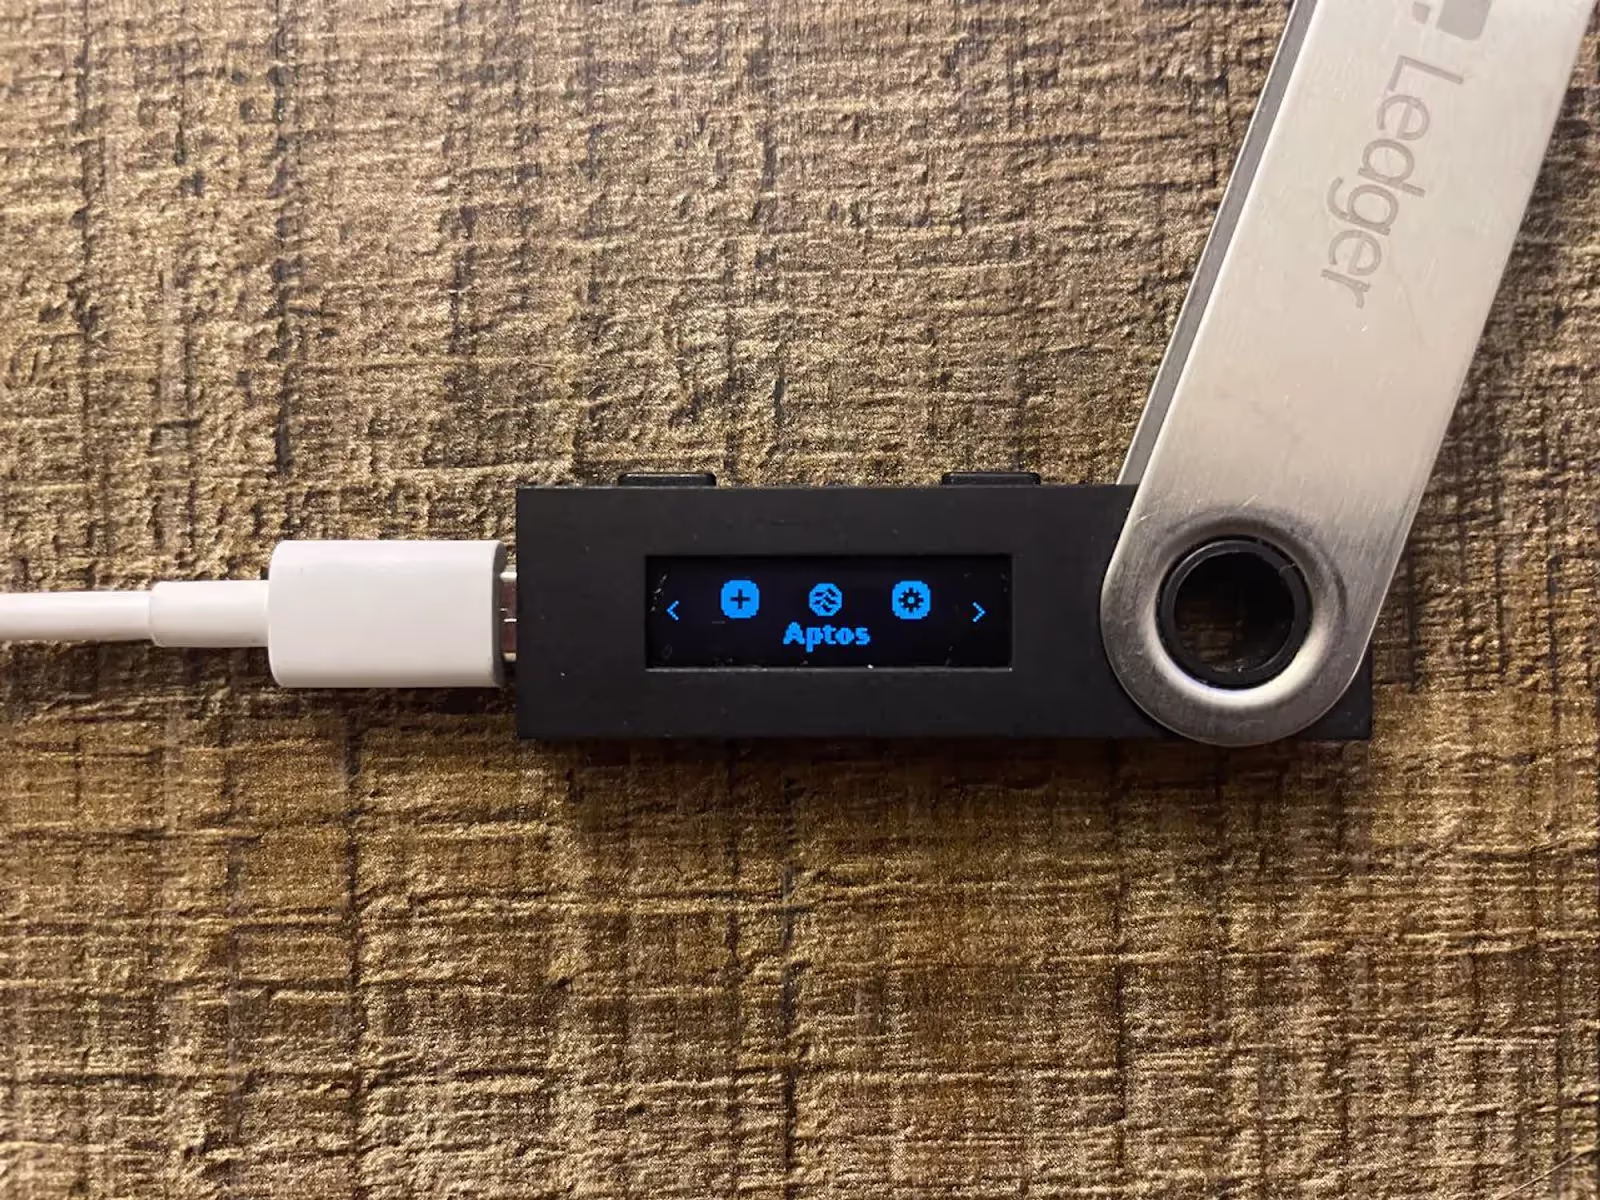
You can install third-party blockchain apps from the app catalog section in Ledger Live by searching for the required blockchain (see the brief tutorial at the end of this article). Such apps are developed by various teams - for example, the one for Aptos was created by Pontem Network - and are subject to a review by the Ledger team.
Trezor has a similar app to Ledger Live called Trezor Suite, as well as a growing number of third-party apps. However, we will focus on Ledger in this article, because Trezor doesn’t have an Aptos app yet - and Pontem Network is an Aptos-centered product studio after all!
How to Use dApps with Ledger
Every blockchain app in Ledger Live’s catalog is integrated with one or more wallets on that blockchain. For example, the Aptos app natively supports Pontem Wallet. Once you connect Ledger to the wallet, you will be able to interact with any dApp normally.
For example, when you use the Connect Hardware Wallet in Pontem Wallet, your Ledger accounts will appear on the list. You can switch to any Ledger account and connect to Liquidswap, PancakeSwap, Topaz, Tortuga, etc.

Ledger Security
While a hardware wallet protects your private keys, it does not grant immunity from various other forms of exploitation, such as phishing. Make sure to download Ledger Live directly from the official Ledger website and take care not to fall for phishing scams. These use social engineering - malicious methods of getting you to compromise a seed phrase or private keys. See our article on crypto safety for additional ways to protect yourself.
What if I Lose my Cold Wallet?
This is the classic downside to a hardware wallet, as your digital assets are now on a physical device. (Remember when people had to go dumpster diving for their lost bitcoin?) Fortunately, Ledger has a solution: a 24-word seed phrase. Simply enter this phrase on a new wallet to restore your assets.
YOU MUST PROTECT YOUR SEED PHRASE for this reason. Moreover, there’s no need to worry about someone stealing your crypto by stealing your hardware wallet.
Your Ledger is secured by an 8-digit PIN. After three incorrect PIN entries, your wallet will perform a factory reset, and you will need to enter the seed phrase to restore it.
Ledger and Aptos
Pontem Network was the first to release a Ledger app for Aptos. You can use it to connect Ledger to Pontem Wallet and to all Aptos dApps that support it. In particular, you can now swap and farm on the Liquidswap DEX, also built by Pontem, stake APT natively, lend funds on Aries, etc. See Pontem’s guide to DeFi on Aptos for an overview of these protocols.
Moreover, now that Pontem Wallet also supports Solana and EVM chains, you can connect your SOL, ETH, etc. accounts in Pontem Wallet to Ledger, too.
How to use Ledger with Pontem Wallet
Here we’ll provide just basic guidelines - see our Aptos Ledger tutorial for more details.
- Install the Aptos Wallet app on your Ledger
Search for Aptos in My Ledger -> App Catalog. Install the app.

- Import/create an Aptos account and deposit APT
Make sure that the Ledger wallet is connected to the computer you’re using, via either USB or Bluetooth, that the wallet is unlocked, and that Aptos is selected. Choose Connect Hardware Wallet in Pontem Wallet’s account tab.

Pick the chain among those supported by Pontem Wallet that you’d like to connect to Ledger with. We’ll go with Aptos.

Click Continue after making sure that the Aptos app is selected on the Ledger device.

Connect to your device once it’s found. Now you are ready to import your accounts into Ledger. You’ll need to confirm importing each account on the Ledger device, verifying that the path and address are correct (see our detailed guide for reference).
You can create and import as many Aptos Ledger accounts as you like. You should now be able to see them on the account list in Pontem Wallet.
- Swap on Liquidswap
Now all you have to do is connect to Liquidswap through Pontem Wallet (making sure that a Ledger account is active). The swapping process is the same as usual, the only difference being that you’ll be prompted to confirm the transaction on the device manually.
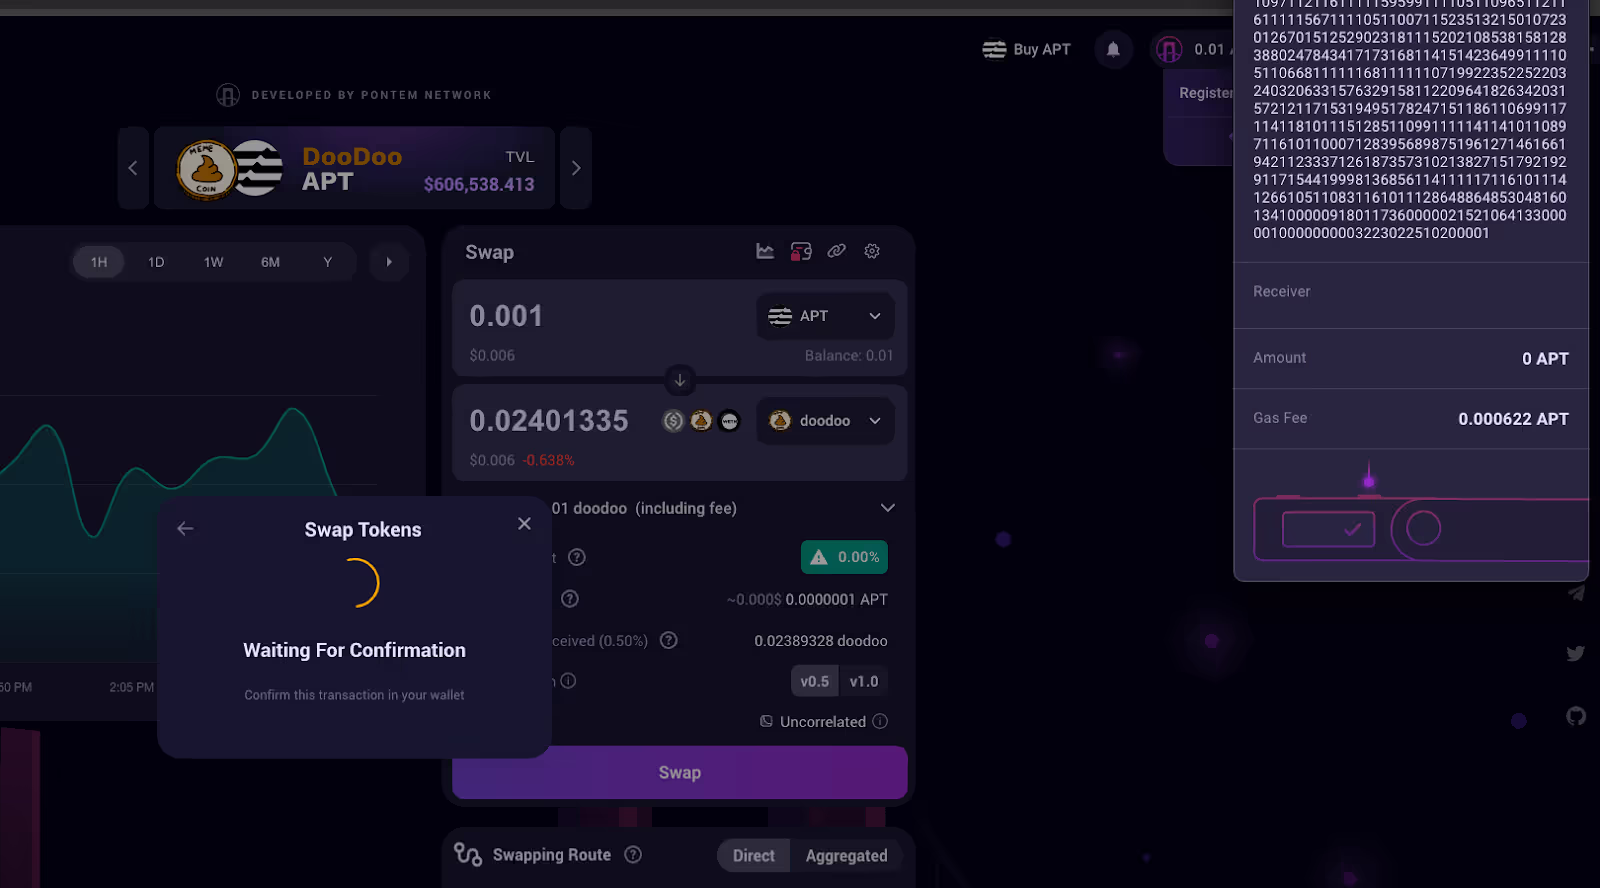
And you’re done! You’ve just used your hardware wallet to trade crypto on Liquidswap. You can rest easy knowing only you have access to your private keys and your assets are safe on your hardware wallet.
We are proud to be the first Aptos product studio to integrate with Ledger. Follow Pontem Network on Twitter, Discord, and Telegram for updates on our products, including Lumio, Pontem Wallet, Liquidswap, and more.
About Pontem
Pontem Network is a product studio building for Aptos and the wider Move ecosystem. We work in close collaboration with the Aptos Foundation to deliver secure audited dApps and groundbreaking tools for coders.